Once upon a time there were a little guy called Carpet and his Person, Dee. The two of them went on adventures and explorations, and over the years learned about a nifty thing called Boss Frog. Now, Dee had always loved frogs, and even had the opportunity to take care of two in her lifetime, but she had never heard of the Boss Frog before.
Circa 2016, and she learns that Boss Frog is closing their doors, and her dreams of meeting and acquiring such a magical frog are dashed. Carpet joins her in the sadness, as he knew he would be a treat. He settles for an alternative in the meantime, a bar not of his choice but of pure function. They wait, patiently, hoping a Boss Frog emerges from the depths, but they only ever see flickers and figments…
March of 2025 became the final reality.
I acquired a Boss Frog Standard Double Hoop Roll Bar for Casper, the aesthetic rollbar of my dreams. The only SCCA-approved double hoop roll bar for Miatas to this day.
I just happened to be on a road trip with Jesse to Arizona for his birthday, and at the exact time that we were in Phoenix someone posted a Boss Frog for sale. My good friend Ashton went and picked it up (along with a handful of other goodies for himself), and I handed him the coin for the bar and brought it home.


And after about a month of waiting for the weather to turn around, and a week of deliberation on what color to paint it, we got started removing the old Zerek Fab roll bar and getting the Boss Frog in. I originally thought about painting the bar gunmetal grey, and then a soft blue, and then a dark blue, and then just silver or Ceramic Metallic, but eventually I settled on white again because it just felt right for Casper. The Zerek bar was white, and while I didn’t choose it (my original desire was just a black bar for the car), the white just feels so signature for Casper now.


You can still find the install guide online (in fact, here’s a direct link), and there is a really well-documented and photographed write-up in like three of the Miata forums (Kepone does a fantastic job here), but I wanted to document it for myself as well. I am pretty awful at photographing in the moment, so I’ve definitely missed a couple steps.


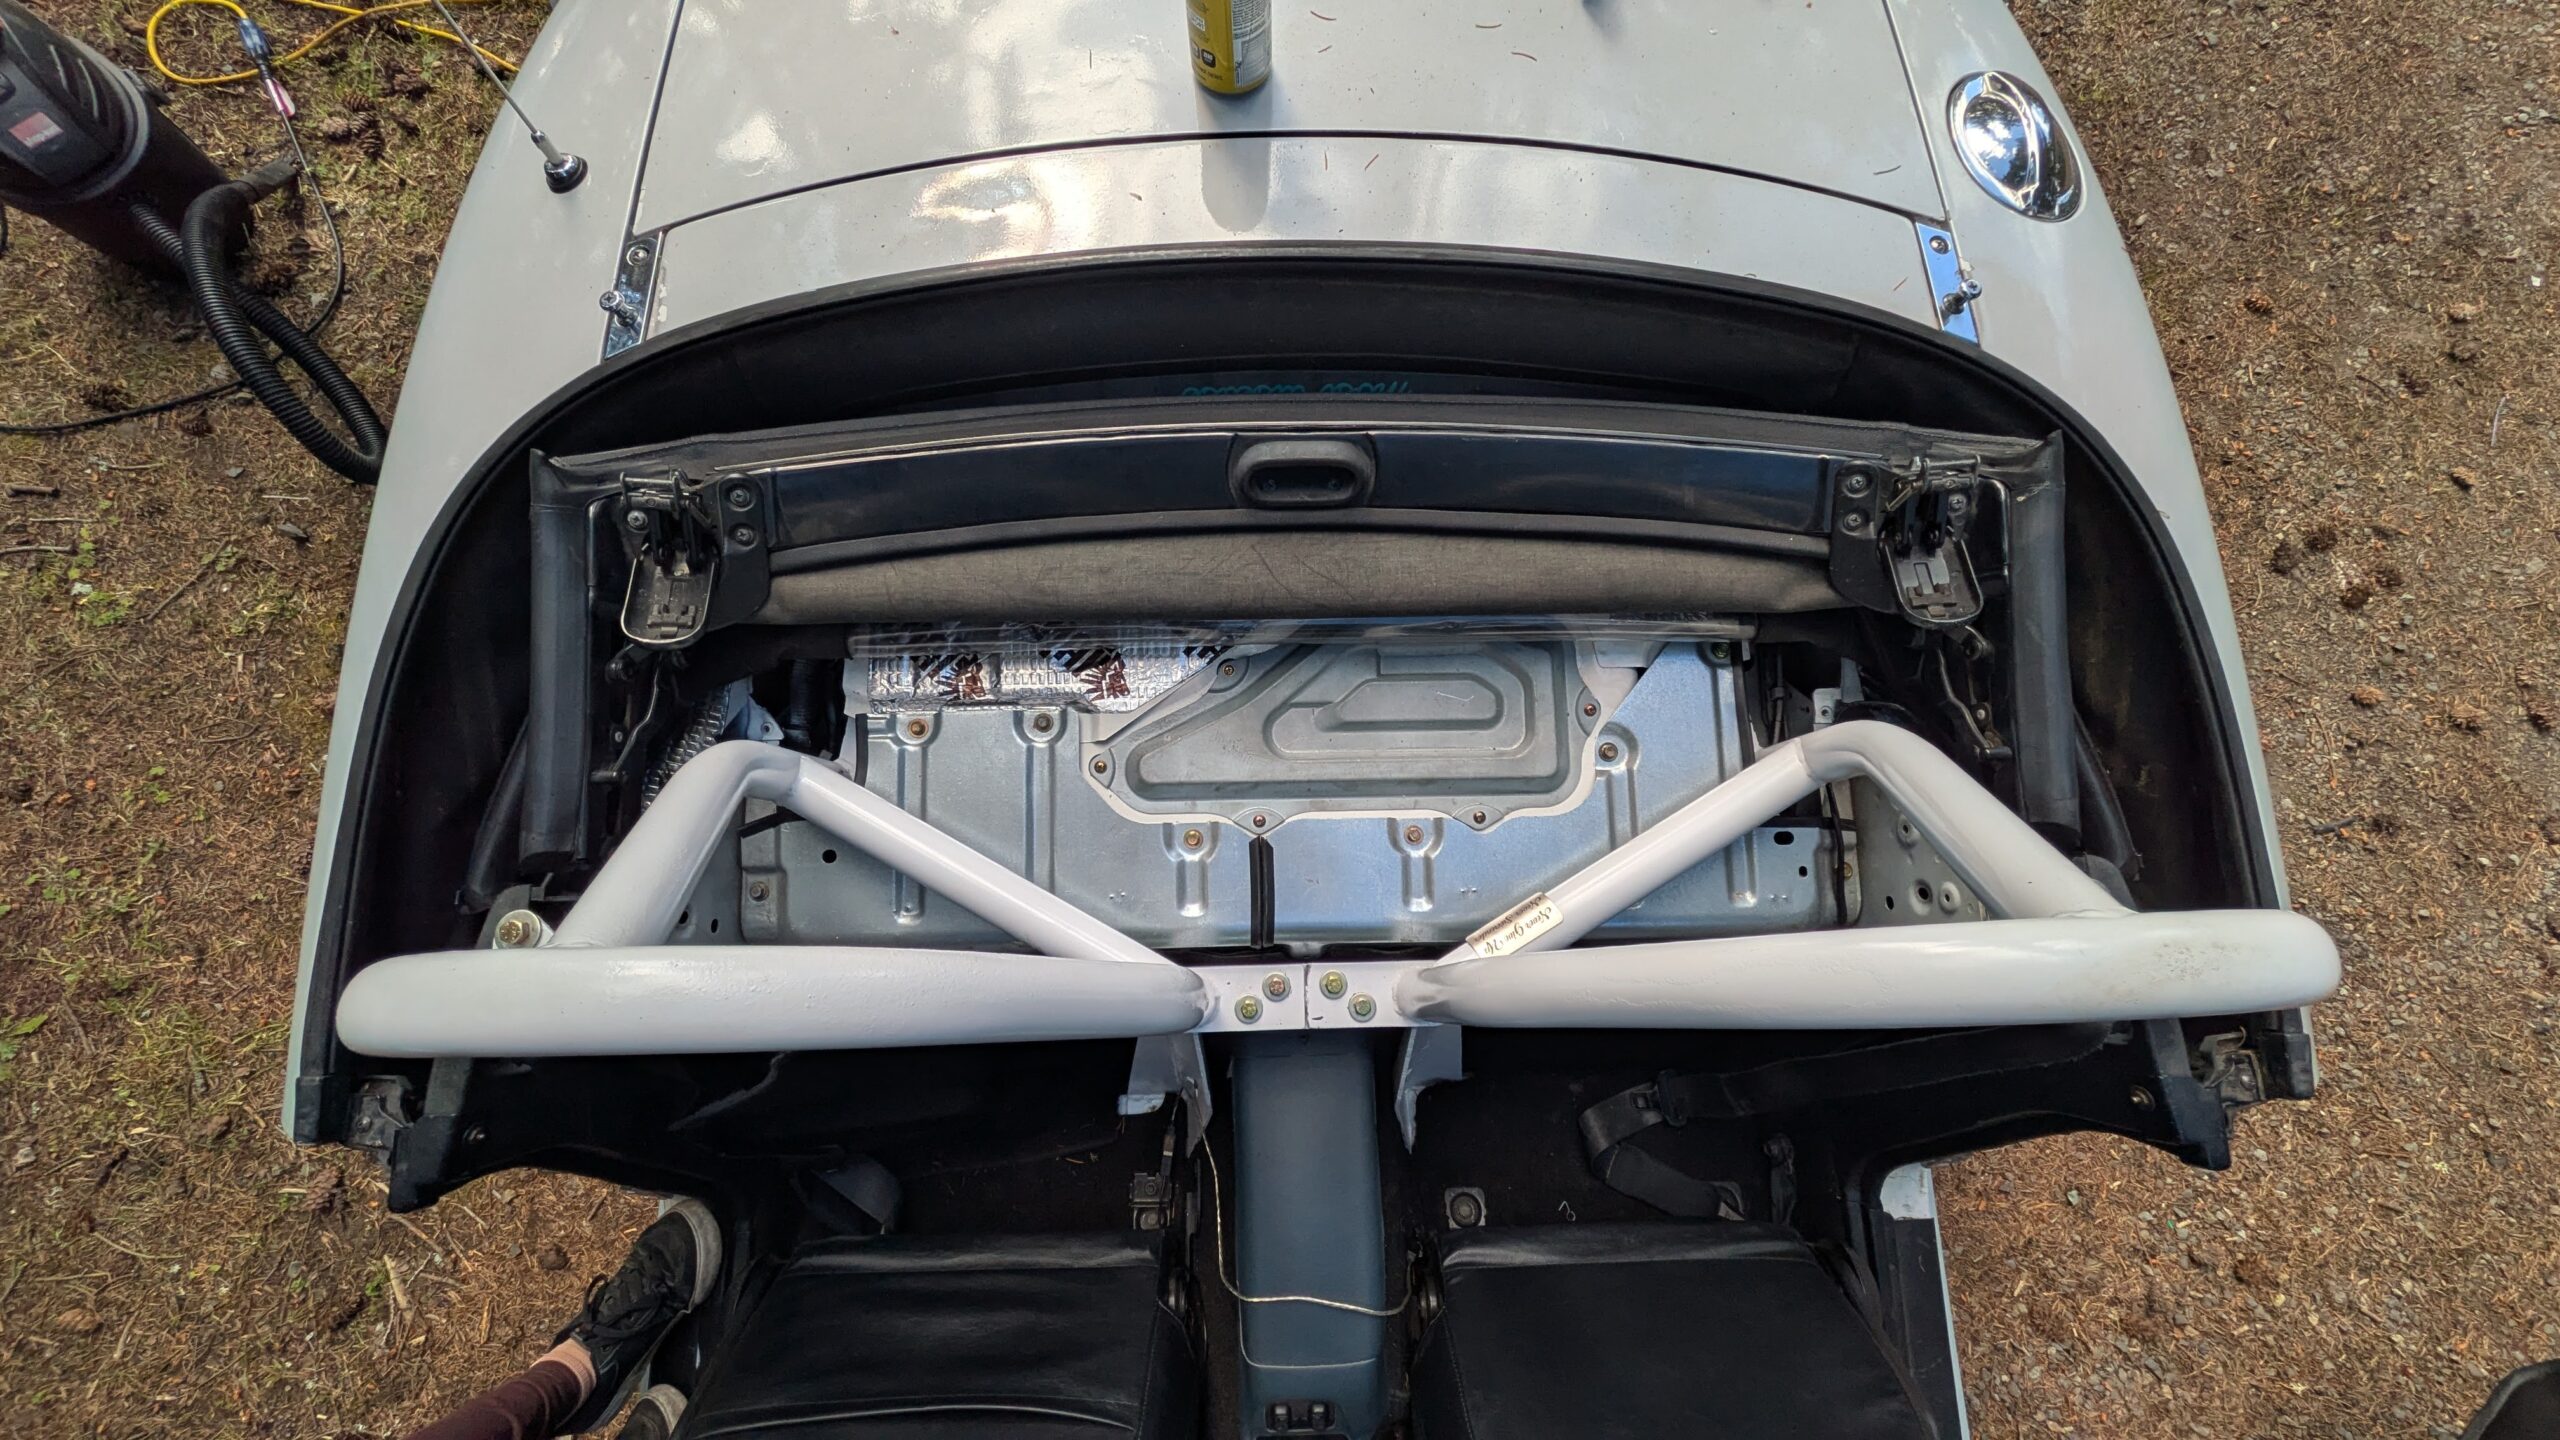
As shown above, I had to fabricate my own backing plates. A couple years ago I happened upon someone who had some random Miata parts that I was able to pick up, including some random ass thick aluminum plates?? And I don’t know why or what compelled me to take them, but I did. So here we are, a couple years later, I still had those plates vibing in my storage bins, and now they’re supporting the Boss Frog bar from behind. I did paint them, even though they’re aluminum, so hopefully they don’t rust or cause any issues.
I know I’m a little ahead here, but I thought I was being clever by not cutting out the circular section of the rear foot plate. It didn’t seem necessary to me at the time, so I just made both sides of the plates uniform for coverage. Turns out, one side of the car is totally fine to do that – the other side has a large wiring harness grommet going through, and requires a massive cut-out. So Boss Frog just made it easier on themselves by producing the same plate for both sides. Smart. I had to go back a couple times to test fit and make sure it wasn’t pinching – the cutoff wheel, dremel, and a hand file all got a workout just for one backing plate.
Also, word from the wise – if you’re making your own backing plates, test fit as often as you can! Use your bolts to ensure that your holes line up – practice placing the plates on the bar. I also highly recommend stepping the holes on your backing plates up to the next drill bit size, because making them exactly 3/8ths for the size of the bolts might cause binding when installing and you really don’t want that. Your washers should make up for any margin of error on the backing plate holes. And of course, if you have the backing plates that came with your kit, you can disregard all of this and just use what came with haha.


So of course, to start, you have to remove your hardtop, your parcel shelf carpet, your behind-the-seat carpet, and package tray. I had to uninstall my old bar, so while I was in there I did a little bit more.


For the past six or seven years, my ECU has just been vibing behind my passenger seat without any support, so it flops around and was slowly grinding a corner down into the chassis. I really quickly cut a sheet of ABS that I had laying around into a makeshift bracket to mount it finally, which kinda works for now, but I’ll need to fab a better one soon. You can see the three holes for the old Zerek bar are right where one of the factory ECU mounting studs lives (and also how I no longer have that stud lol). Luckily, I was able to reuse the two upper holes for the Boss Frog. But when installing your Boss Frog bar, if you have a 1994-1997, just remember that your ECU might get in the way a little and you might have to chop a tab off for the stud.
Additionally, you can see how the carpet is pulled back in the corner there? That’s a little foreshadowing – you have to peel out some of the seam sealer around the transmission tunnel to properly install the Boss Frog base. It isn’t hard, I used a flathead and a rubber mallet, but I suggest painting the parts you peel up if you accidentally scratch through the primer underneath.

So I didn’t remove my wheels to do this install – technically you don’t have to, if you are agile enough, but it absolutely makes it easier. However, you do have to remove the little fender liner protectors (not shown, already removed) which are bolted in by four 10mm bolts. Two of the bolts are towards the front of the car, one is obviously visible (you can see where it would be in the photo above), and one is hidden further inside the chassis to the left of the visible one. You must remove the liner on both sides of the car, and don’t forget to reinstall!


Here’s some extra photos of test fitting and the process of seeing what worked and what didn’t as I went.

When you get started, don’t forget to put your rear seat carpet back in. You have to trim the carpet around the feet area before you install it, or it won’t fit – ask me how I know LOL. Also, you have to cut the floor carpet just a little bit too – see how it is laying over the bolts in my photo above? You don’t want to bolt it through the carpet, and you don’t want the carpet to bunch weirdly underneath it, so you have to cut it. It’s easy, I used some shit-tier scissors, but you can use a sharp box blade or a knife or better scissors than I had too. The rear carpet has to be trimmed slightly and the cushion fluff on the back side has to be trimmed out too just where the feet bar rests – the install guide shows exactly where to trim.
I don’t have any photos of the next install part, but it involves the seat belts. Boss Frog recommends unbolting the top of the seat belt receiver and angling it towards the inside of the chassis since the belts themselves need to be on the inside of the bar. I didn’t do that. Don’t do what I did and leave them in the stock position – my seat belts don’t retract anymore LOL. I will have to remedy this. You should absolutely angle them if you want your seat belts to function properly.
But when it comes to the seat belt receiver, Boss Frog recommends squishing the lower tab between the chassis and the bar, so that’s how I did it too, and it works. It took a little bit of fenagling, but once you get it to thread, bolt that sucker down because it will make the upper seat belt tower bolt so much easier to get started. No joke, I probably struggled with bolting the upper one in for an hour before I understood that actually tightening down the lower bolt pulled the bar in closer to the position it needed to be in. I didn’t have the middle feet bolted down, so it had plenty of room to play, but I actually cross-threaded one of my seat belt towers and had to re-tap the threads once I figured out the trick. Keep the bolts a little loose though so you can get the middle feet threaded, but once you’ve got all eight of the nuts/bolts started, go ahead and tighten down what you’ve got started.
Then it’s time to drill some holes.


The drill bit should be 3/8ths inch, but you can always start with a pilot hole if you’re not confident in your drill bit. I was able to drill all my holes out from the top, but if your bit isn’t long enough then it’s recommended to drill the front two that you can, bolt them together, and go from the bottom to drill the third hole. Don’t forget to vacuum up your drill shavings though, you don’t want them lingering in your interior.


Take your time! Use a friend if you have one available. A second set of hands goes a long way, especially when tightening down the bolts. I’m very grateful that I had Jesse around for that part. While I did about 90% of the install by myself, he was absolutely necessary when tightening down the middle feet, and extremely helpful for the sides and rear feet too. <3 Shoutout to boyfriends for helping their girlfriends work on their cars.


AND THEN PUT IT ALL BACK TOGETHER!! I didn’t take any pictures of the process of trimming the side panels – because I haven’t had them installed in the car in literally years. I’ve kept them in my parts hoard though, and yes I did trim them, and yes they are installed now. I used a dremel with a cutting wheel, a flat file for the sharp edges to smooth them out. I’ve seen a handful of people recommend using edge trim to make those edges look better and also not chafe against the bar, so I will be getting some of that myself and will update when I do!
Side note: I did not cut my parcel tray in half like the install guide recommends, as I do not intend to reinstall it just yet, so I cannot assist with tips or tricks on that part. The install instructions and guide that Kepone wrote both have the tray cut to reinstall though.

But the bar is now installed, fully functional and painted white. I’m so happy with it!!


I have discovered one huge negative to the bar though: I lost my behind-the-seat cupholder. ;-;


UPDATE: You can click here to read about the parcel shelf install!